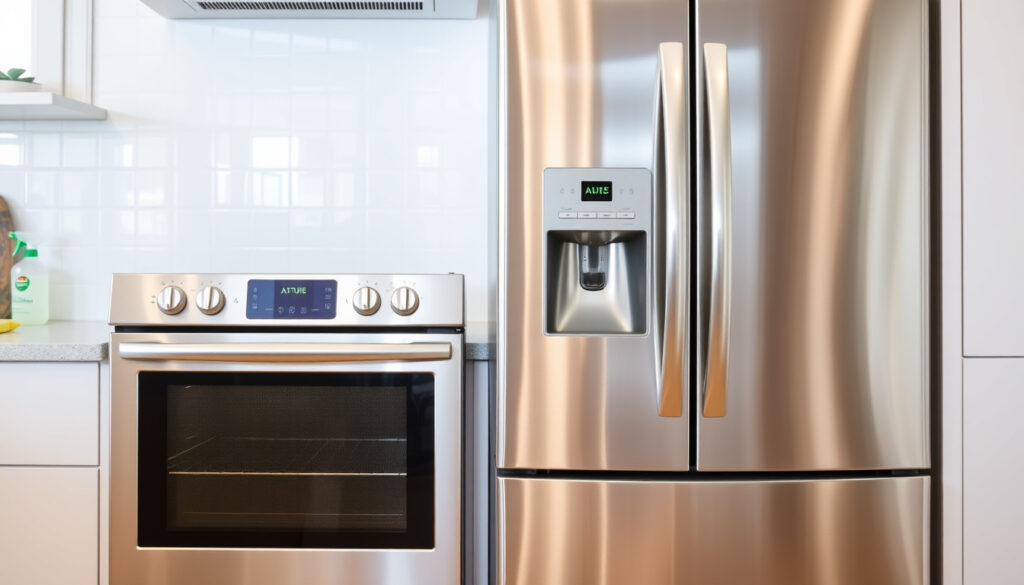
How to Clean Stainless Appliances: Streak-Free Guide
Fingerprints seem to find stainless steel appliances within minutes of wiping them clean. If you’ve ever spent 20 minutes polishing only to end up with a fridge that looks worse than when you started, you’re not alone.
Top Cleaner: Warm Soapy Water · Key Steps: 5 Steps · Natural Option: Vinegar Solution · Avoid Streaks: Microfiber Cloth · Common Mistake: Steel Wool
Quick snapshot
- Dish soap and warm water (KitchenAid Official Guide)
- Bar Keepers Friend for stubborn grime (KitchenAid Official Guide)
- Distilled white vinegar (1:1 with water) (Lowe’s Guide)
- Steel wool — scratches surface permanently (KitchenAid Official Guide)
- Bleach and abrasive scrubbers
- Citrus-based or acidic cleaners on PrintShield finish
- Wipe with soapy water following the grain (KitchenAid Official Guide)
- Dry immediately with microfiber cloth
- Buff in grain direction for shine
- KitchenAid 4-step approach: soap, sponge, dry, buff (KitchenAid Official Guide)
- affresh Spray for tough spots
- PrintShield finish: soap and water only
The table below summarizes the key solutions, tools, and methods for maintaining stainless steel surfaces.
| Property | Value |
|---|---|
| Primary Solution | Warm soapy water |
| Streak Preventer | Microfiber towel |
| Natural Shine | White vinegar |
| Brand Method | KitchenAid 4 steps |
| Vinegar Concentration | 5% acetic acid (distilled white vinegar) |
| Polish Option | Olive oil applied after vinegar wipe |
What is the best thing to clean your stainless steel appliances with?
KitchenAid’s official guidance points to warm soapy water with a soft sponge as the go-to for everyday cleaning. Their KitchenAid Official Guide recommends applying dish soap directly to the sponge, wiping in the direction of the grain, then drying immediately with a microfiber cloth. For appliances with PrintShield finish — KitchenAid’s fingerprint-resistant coating — the rule is stricter: only mild soap, warm water, and microfiber cloth; stainless steel cleaners, vinegar, or window sprays are off-limits.
Commercial cleaners
KitchenAid’s own affresh Stainless Steel Cleaning Spray targets stubborn grime that soap can’t handle. The brand instructs users to apply the spray in an “S” motion and wipe with a microfiber cloth to avoid introducing new streaks. Bar Keepers Friend is another widely endorsed option for baked-on residue, though it requires thorough rinsing to prevent grit from leaving micro-scratches.
Natural alternatives
Distilled white vinegar and warm water mixed in equal parts is a staple of DIY stainless cleaning. Lowe’s Guide notes that vinegar’s 5% acetic acid content cuts through grease effectively while leaving no coloring agent that could stain the surface. Mr. Appliance’s natural cleaning guide recommends the same 1:1 ratio, applied via spray bottle and wiped with the grain.
The trade-off: KitchenAid explicitly warns against vinegar on stainless steel, citing potential coating damage — a point of tension with the broader cleaning community that widely endorses vinegar-based methods.
How do you clean stainless steel appliances without streaking?
Streak-free results come down to two non-negotiables: wiping with the grain and drying immediately. KitchenAid’s product help documentation emphasizes that water spots cause discoloration if left to air-dry. The solution is simple: never let the surface dry on its own.
Preparation steps
- Rinse your microfiber cloth frequently — a dirty cloth redistributes grime
- Use a fine mist spray setting to avoid cleaner running down and leaving tide marks
- Clear loose debris with a dry cloth before applying any liquid
Drying techniques
Buff with a dry microfiber towel immediately after wiping, working in the direction of the grain. Cleaning tutorial creators describe this final buff as “the secret sauce” for achieving that showroom shine. The cloth should be completely dry and clean — any moisture left behind becomes a water spot.
Even premium microfiber cloths lose their streak-fighting properties after about 30 wash cycles. If your “clean” cloth is leaving fine lines, it’s time to replace it.
What should you not use to clean stainless steel appliances?
The list of forbidden cleaners is longer than most people expect. KitchenAid’s official guide explicitly prohibits steel wool, paper towels, abrasive scrubbers, bleach, citrus-based cleaners, and ammonia — and the list applies to all stainless finishes, not just premium coatings.
Harsh abrasives
- Steel wool: leaves permanent micro-scratches that trap debris and dull the finish
- Scouring powders: same damage mechanism, harder to see immediately
- Brittle plastic scrubbers: often stiff enough to scratch under pressure
The implication: once steel wool or scouring powders leave their mark, the damage is irreversible without professional refinishing. Even “gentle” scrubbers can leave marks under pressure.
Chemical pitfalls
Bleach and ammonia-based cleaners don’t just damage the finish — they can cause pitting that accelerates corrosion over time. KitchenAid’s cooktop cleaning guide notes that all-purpose cleaners are acceptable only if they are ammonia-free and citrus-free, but the brand’s preference remains soapy water or affresh.
Some “stainless steel cleaners” sold in hardware stores contain mild abrasives that are safe for outdoor grills but too aggressive for kitchen appliances. Check the label before applying any product you’re unsure about.
What this means: the safest approach is to default to soap and water unless you have explicitly verified that a product is approved for appliance finishes.
What are common stainless steel cleaning mistakes?
Beyond the obvious no-nos, the mistakes that ruin stainless steel finishes are subtler than most cleaning guides admit. The difference between a fridge that looks new and one that needs refinishing often comes down to habits people don’t realize they’re doing wrong.
Wiping direction
Cleaning against the grain is the most frequently committed error. Stainless steel has a directional grain pattern — either horizontal or vertical depending on the manufacturing finish. KitchenAid’s guidance states that wiping perpendicular to the grain forces debris into the grooves rather than lifting it out, creating the illusion of cleanliness while leaving micro-scratches that dull the surface over time.
Residue leaving
Not rinsing the surface after using cleaning products is a common oversight. Soap film, vinegar residue, and cleaning spray remnants all leave marks if not followed by a fresh-water wipe and immediate dry. The Mr. Appliance blog specifically recommends labeling vinegar spray bottles to avoid accidental use on surfaces where you intended to apply a different product.
The pattern: most cleaning failures trace back to skipping the rinse-and-dry step, assuming that what you can’t see won’t hurt you.
How do you make stainless steel appliances look new again?
Restoring a worn stainless surface requires matching the treatment to the type of damage — and knowing when a surface is too far gone for DIY methods.
Polishing methods
For light hazing and fingerprint buildup, a vinegar wipe followed by an olive oil buff can revive the finish. Lowe’s Guide describes applying a few drops of olive oil to a microfiber cloth after the vinegar wipe to create a protective barrier against smudging. The oil is not a cleaner — it only works on a surface that has already been properly cleaned.
Restoration tips
Baking soda paste addresses stubborn stains and heat discoloration. KitchenAid’s cooktop cleaning guide recommends a paste of baking soda and water applied in the direction of the grain, followed by a thorough rinse and dry. For oxidation spots or minor pitting, a stainless steel polish compound may be needed — but test on an inconspicuous area first.
Deep scratches and pitting cannot be polished out. If your appliance has visible surface damage, professional refinishing costs less than replacement but requires specialized equipment — don’t attempt to sand out scratches with household sandpaper.
What this means: for homeowners with standard finishes, the baking soda and vinegar methods can extend the life of your appliances between professional servicing.
Step-by-step stainless steel cleaning
Five steps, applied consistently, deliver the results brands like KitchenAid promise on their specification sheets.
- Clear loose debris: Dry-wipe the surface with a clean microfiber cloth to remove dust and loose particles before introducing any liquid.
- Apply cleaner: Spray warm soapy water or a 1:1 vinegar-water solution onto your microfiber cloth — not directly onto the appliance — and wipe gently along the grain.
- Rinse if needed: If using soap, go over the surface with a damp cloth plain water to remove any residue.
- Dry immediately: Using a second dry microfiber cloth, buff the surface dry right away. Never let water air-dry on stainless steel.
- Buff for shine: With a third clean, dry microfiber cloth, buff in the direction of the grain until the surface gleams. Optional: apply a thin coat of olive oil on the cloth for added protection.
“Do not use powders or any cleaning supplies that are acidic, vinegar or citrus-based, as it may stain or damage the coating of your appliances.”
— KitchenAid Official Guide (official brand guidance)
“Distilled white vinegar is safe to use on stainless steel appliances. It removes grease and grime and it doesn’t contain a coloring agent which can stain the surface of stainless steel.”
— Lowe’s Guide (home improvement retailer)
Related reading: De Longhi Coffee Machine Cleaning
mrappliance.com, producthelp.kitchenaid.com, cleanmama.com, kitchenaid.com, mensjournal.com
While vinegar and baking soda excel at streak-free results, note that stainless steel can rust if exposed to harsh chemicals or chlorides during cleaning.
Frequently asked questions
Can WD-40 be used to clean stainless steel?
WD-40 can remove adhesive residue and stubborn marks, but it leaves an oily film that attracts dust and requires thorough degreasing afterward. It is not a routine cleaner and should be used sparingly for specific spot treatments only.
Does olive oil really shine stainless steel?
Olive oil adds temporary shine and creates a barrier against fingerprints, but it is not a cleaner — it only works on already-clean surfaces. Applied to a dirty surface, it seals grime in place.Buff with a dry microfiber cloth after application to avoid greasy residue.
What household cleaner can I use on stainless steel?
Mild dish soap dissolved in warm water is the safest household option. All-purpose cleaners are acceptable if they are ammonia-free and citrus-free, but KitchenAid recommends sticking with soapy water or a brand-approved cleaner like affresh.
What is the best home remedy to clean stainless steel fridge?
Warm soapy water with a soft microfiber cloth delivers the safest everyday clean. For a natural approach between washes, a 1:1 vinegar-water spray followed by an olive oil buff on a clean microfiber cloth keeps fingerprints at bay without risking damage.
How do you remove permanent streaks on stainless steel appliances?
Permanent streaks are usually micro-scratches from abrasive cleaners or incorrect wiping direction. They cannot be polished out with household products. A stainless steel polish compound may reduce their appearance, but deeply embedded streaks require professional refinishing.
More related posts
 Rajasthan Royals vs Chennai Super Kings Timeline – 32 Matches, 16 Wins Each
 Shoulder Length Hairstyles for Fine Hair: 25+ Volumizing Looks
 Bank Holiday Pay Ireland: Rules, Calculations & Entitlements
 Paul Thomas Anderson Movies – Complete Filmography Ranked Guide
 The Roses Movie 2025: Cast, Where to Watch, Reviews
 Salary Calculator Ireland 2025: Tax, Take-Home & Hourly
 HR and Payroll Self Service: HSE Login and Access Guide
 TUD Calendar 2025/26: TU Dublin PDF, Dates & Timetables